Jiggle Bones
Verlet-integration soft-body physics for skirts, hair, capes, accessories. The motion that animation engines usually skip.
Tier: Builder Pro Menu:
Physics → ✨ Jiggle Bones
Tune the physics live, then bake the simulation into ordinary editable keyframes — undo-able, polishable, and they survive export to any platform. Validated on mocap, retargeted, and from-scratch clips; Jiggle Bones graduates out of BETA.
What it does
When a character moves, secondary motion comes along for the ride: hair sways, skirts swing, capes flutter, jewelry bobs. These chains of bones are attached to the body but should react to body motion with their own delayed, dampened, physically-plausible response — not just rigid-follow the parent bone.
Most browser-based animation tools skip this entirely — it's a hard problem to solve in real time. Kinetiq ships it built-in, powered by Kinetiq Physics, our in-engine Verlet soft-body simulator.
The result: when your character moves, their skirt fabric trails realistically. When they stop, the skirt settles with a brief overshoot and decay. When they spin, hair swings out by inertia and follows back. All in the browser. All in real time.
How it works (Verlet integration)
Verlet integration is a numerical method for simulating particles connected by stiffness constraints. Each "jiggle bone" gets:
- A particle at its position (the bone's tip in world space).
- A stiffness constraint to its parent particle (the chain).
- An inertia term — the difference between current and previous positions, which carries velocity automatically.
- A gravity term — pulls particles downward.
- A damping term — bleeds energy out so the chain settles.
Per frame, the simulation:
- Computes new positions by extrapolating from velocity (Verlet step).
- Applies gravity.
- Iteratively enforces stiffness constraints so the chain stays connected.
- Updates the bone rotations to match the new particle positions.
The result is a chain that swings, settles, and reacts naturally to the parent body without any keyframe data — pure physics layered on top of the underlying animation.
Configuring jiggle chains
The Jiggle Bones panel surfaces a chain editor where you mark bones as "jiggle":
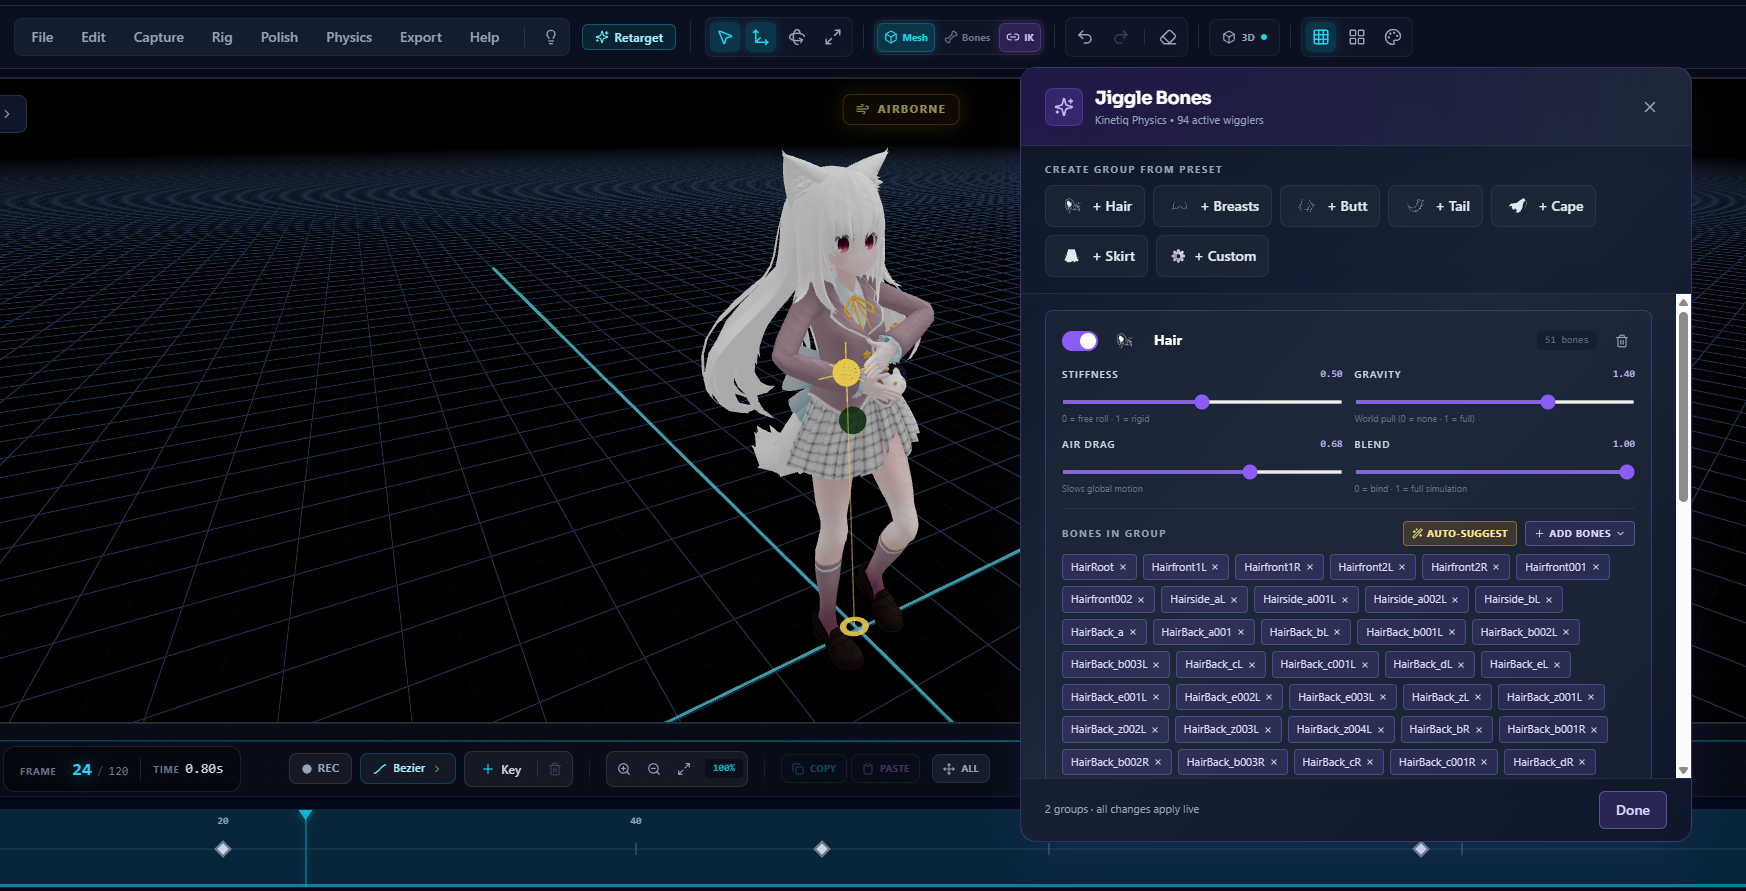
The Jiggle Bones panel. Start from a preset (Hair, Breasts, Butt, Tail, Cape, Skirt) for a one-click setup, or build a Custom group. The four sliders shape every chain in the group: Stiffness (how rigid), Gravity (how heavy), Air Drag (how much it slows global motion), and Blend (how much of the simulation bleeds into the bake — 0 = pure animation, 1 = pure physics). Everything updates live in the viewport as you drag.
- Open
Physics → Jiggle Bones. - The hierarchy view lists all bones in the active avatar.
- For each bone you want to jiggle (e.g. the skirt cone, hair tendrils):
- Toggle the Jiggle flag.
- Adjust per-chain parameters:
- Stiffness (0.0 - 1.0) — how rigidly the chain follows its rest shape. Higher = stiffer, less swing. Lower = looser, more swing.
- Damping (0.0 - 1.0) — how quickly motion decays. Higher = motion dies off fast. Lower = chain swings longer.
- Gravity (per-chain or global) — how strongly the chain falls. Higher = realistic skirt heaviness. Lower = floaty hair.
- Max Stretch — limits how much the chain can elongate beyond rest length. Critical for preventing rubber-band artifacts.
The defaults are tuned for medium-weight cloth (skirt-like). Adjust per chain depending on material:
- Heavy fabric (long coat) → low stiffness, high damping, high gravity.
- Light fabric (silk, hair) → higher stiffness (more snappy), lower gravity.
- Metal accessories (chains, beads) → high stiffness, low damping, high gravity.
Live preview while authoring
Jiggle Bones runs live during playback. Toggle a bone to jiggle, hit play — the chain immediately starts simulating. Adjust stiffness — the chain's response changes mid-playback. The live sim is your preview; when it feels right, bake it.
Bake to Timeline — physics into keyframes
The live simulation is great for tuning, but it only exists while Kinetiq is running it. Bake to Timeline converts the simulation into real keyframes:
- Tune your chains until the motion feels right in playback.
- Click the Bake to Timeline strip in the panel (violet when armed, emerald Baked ✓ on success).
- The simulated motion is recorded as ordinary keyframes on the timeline. The baked groups hand off to the timeline — the live sim disables itself for them.
What you gain:
- It survives export. The hair sway and skirt swing ship inside your FBX / GLB / BVH /
.animfile — they play in Second Life, Unreal, Blender, anywhere. No Kinetiq required at the destination. - It's editable. Baked keys are normal animation data — Simplify them, Smooth them, hand-tweak a single frame.
- It's undo-able.
Ctrl+Zrestores the pre-bake state and you can re-tune and bake again.
Validated on all three clip sources: mocap output, retargeted clips, and animations keyed from scratch.
Known limitations
The Verlet implementation is solid for the common skirt/hair/cape case but has known limitations:
No collision (yet)
Chains don't collide with the avatar's body or other chains. A skirt that should rest against legs may pass through them. We're tracking integration with cannon-es or Rapier3D for real collision support — likely 8-15 hours of work, deferred to post-launch (May 2026+) to avoid bundle-size impact on free users.
No constraint to body curves
The chain stiffness is to its own rest shape, not to a curve guide on the body. So a hair chain doesn't "follow" the back of the head as the head turns; it just dangles from its root.
Single-chain at a time
The current UI focuses on configuring one chain at a time. Bulk-configuring many chains across a complex character (full hair + dual ponytails + skirt + scarf) is workable but tedious. We're planning a bulk-configure mode post-launch.
Performance on dense rigs
30+ jiggle bones running simultaneously will tax low-end GPUs. The simulation is CPU-side TypeScript, so it doesn't help to have a beefy GPU. If frame rate drops, reduce the iteration count in the chain config or disable some chains during preview (re-enable only at bake/export).
Workflow — adding jiggle to a skirt
- Import an avatar with a skirt rig (e.g. an SL Bento Female with skirt bones).
- Open
Physics → Jiggle Bones. - In the hierarchy, mark the skirt root bone and its chain (typically
mSkirt0throughmSkirt9for SL). - Set per-chain values:
- Stiffness:
0.3(loose enough to swing meaningfully) - Damping:
0.4(settle in ~1 second) - Gravity: enabled, default magnitude
- Stiffness:
- Toggle the panel ON. The simulation kicks in immediately.
- Play a walk or turn animation. The skirt should swing as the avatar moves.
- Tune by ear: too floaty? Raise stiffness. Too stiff? Lower it. Settles too fast? Lower damping.
- Once it feels right, click Bake to Timeline — the swing becomes editable keyframes that ship with your export.
Edge cases
Avatar's skirt mesh isn't bone-driven
Some avatar meshes have cloth/skirt geometry that's not weight-painted to a bone chain — instead, it's a separate mesh with morph targets or simulated separately. Jiggle Bones only animates bones. If your skirt isn't bone-driven, this tool can't help directly; you'd need to weight-paint the mesh to a bone chain first.
Hair with multiple branches
A character with two ponytails or split hair tendrils requires multiple chains — one per branch. Configure each separately.
Performance with many chains
20-30 chains running simultaneously on a complex character may dip below 60 FPS on low-end devices. Reduce the iteration count or temporarily disable non-critical chains during preview.
Related
- Foot Locking — main body motion stays locked while jiggle layers on top; both bake to the timeline
- Quality Score — validate the body motion before layering secondary physics on top
- Roadmap — collision support (cannon-es / Rapier3D) is on the exploration list