Auto-Rig
Drop any humanoid mesh and Auto-Rig builds the skeleton, binds the skin, and lands the character in the editor ready to animate — you never hand-place a single bone.
Tier: Free to rig & preview · export unlocks on Starter Where: the Auto-Rig button in the top bar of the editor
Auto-Rig is in Beta. It works best with a clean T-pose today — A-pose and more input formats are on the way. If a humanoid mesh comes out odd, you can always fall back to Rig Studio for hands-on control.
What it does
Most riggers make you do the hard part. Mixamo and AccuRIG hand you a wizard and ask you to click the chin, the wrists, the knees, the elbows — you become the rigging algorithm, the tool is just the UI.
Auto-Rig flips that. Drop a humanoid .glb, .gltf, or .fbx and it:
- detects the joints from the mesh and fits a clean, canonical skeleton,
- binds the skin weights with no bleed at the joints,
- optionally measures the fingers from your mesh's real geometry,
- and lands the avatar in the editor fully riggable — hand & foot IK, a REC timeline, ready to retarget, polish, and export.
It runs 100% in your browser. Nothing uploads, there's no GPU server, and you don't need an account to try it.
Auto-Rig vs Rig Studio — Auto-Rig is the automatic, one-button path for humanoid meshes. Rig Studio is the hands-on wizard for non-standard or non-humanoid rigs (quadrupeds, robots, unusual skeletons). Start with Auto-Rig; reach for Rig Studio when a mesh needs manual joint identification.
The workflow
Five quick steps. Click Auto-Rig in the top bar to open the studio.
Step 1 — Setup
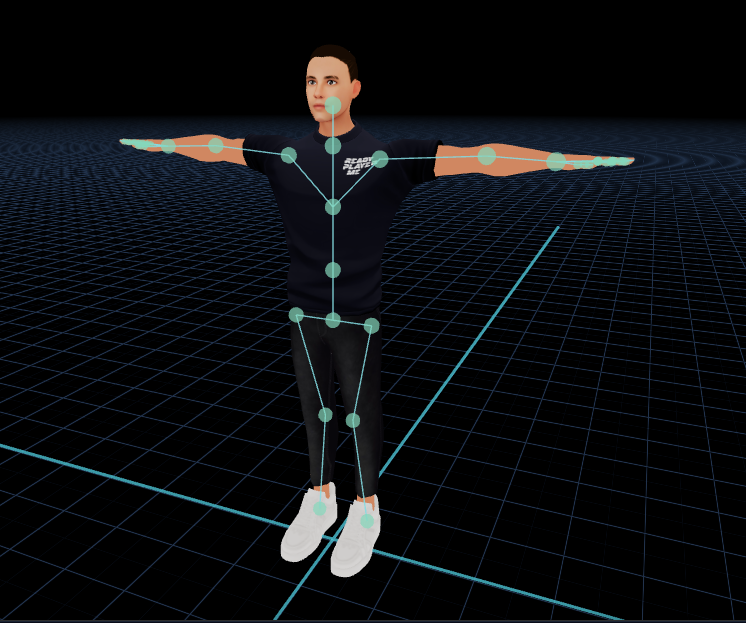
Drop (or confirm) your humanoid mesh. A T-pose — arms straight out to the sides, legs slightly apart — gives the best result. Auto-Rig checks the orientation so the character faces the right way before it begins.
Step 2 — Markers
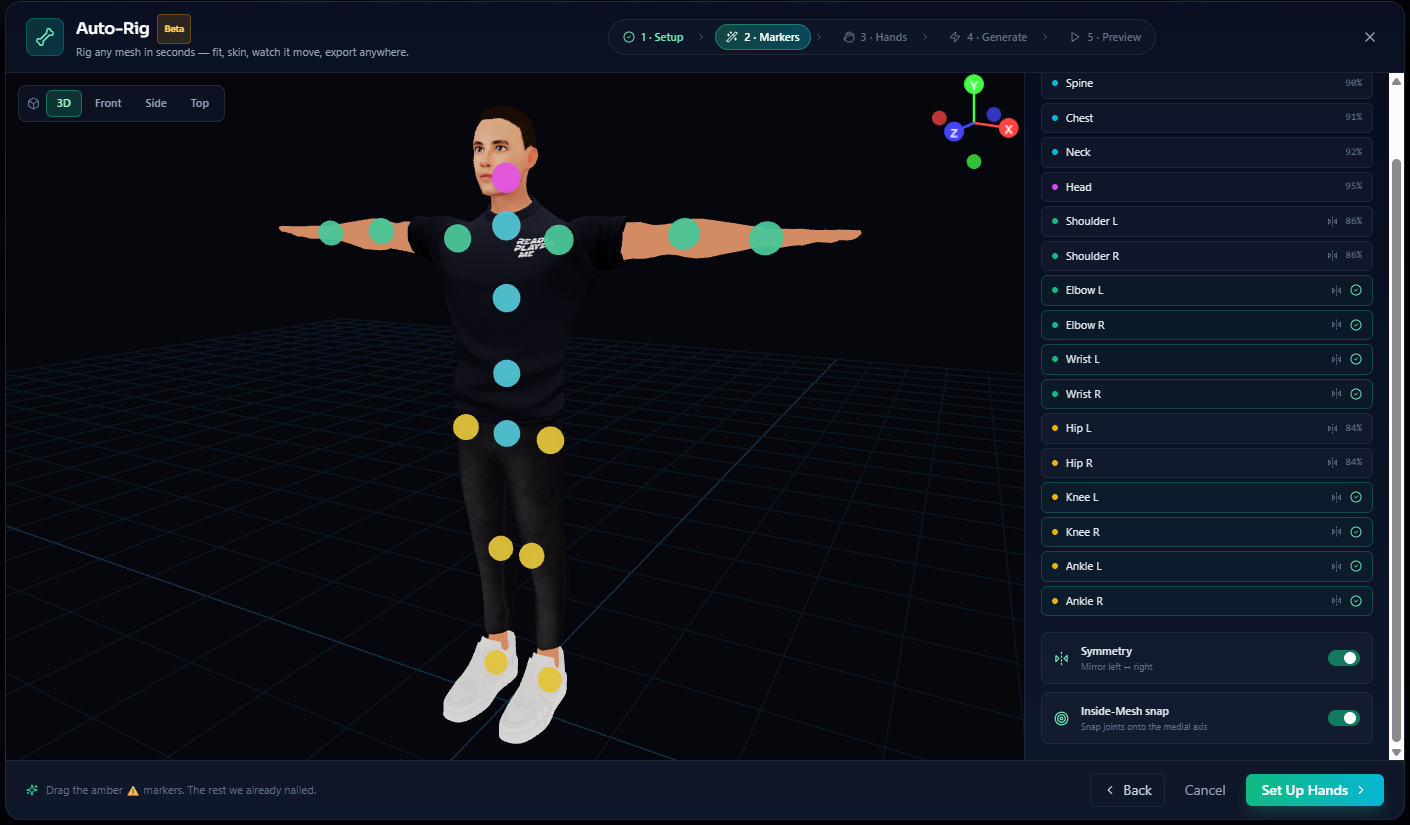
Auto-Rig detects the body's joints and drops markers on them — shoulders, elbows, wrists, hips, knees, ankles, spine, neck, head. You're not placing bones from a blank slate; you're reviewing what it found. Nudge any marker along the limb if it looks off — the markers ride the surface of the mesh, so they're easy to read and hard to lose in depth. Leave Symmetry on and a fix to one side mirrors to the other.
Auto-Rig detects the joints for you — your job is just to glance over the markers and nudge anything that looks off.
Step 3 — Hands (optional)
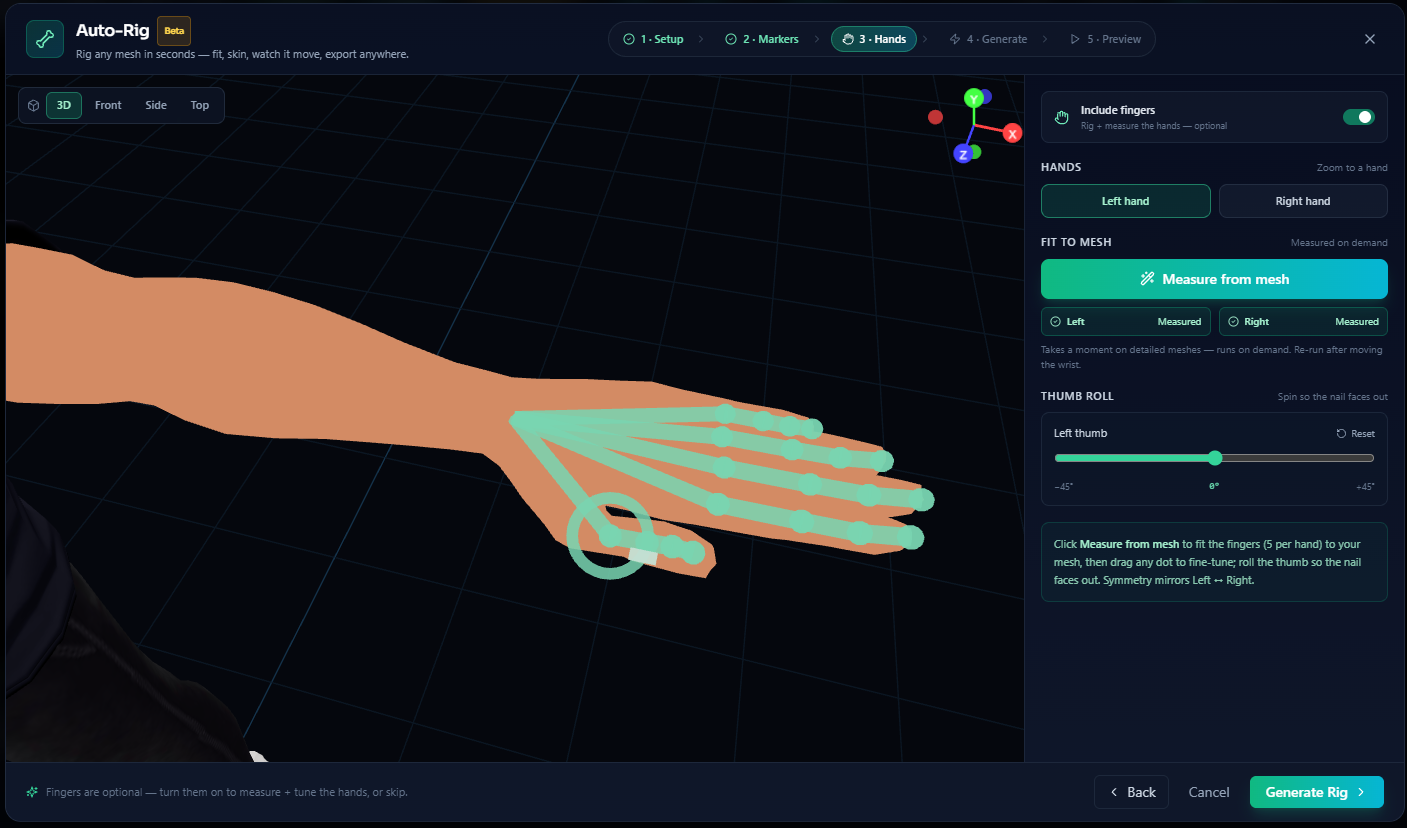
Want posable fingers? Turn hands on. Measure from mesh reads the real finger curves on your model — not a generic template — so the finger bones follow the actual geometry. Switch between the Left and Right hand tabs, and use the Thumb-roll dial to set a natural, opposed thumb. Don't need fingers? Skip this step for a clean body-only rig.
Fingers are measured from your actual mesh, not a template. Symmetry rigs both hands at once.
Step 4 — Generate & the Influence Map
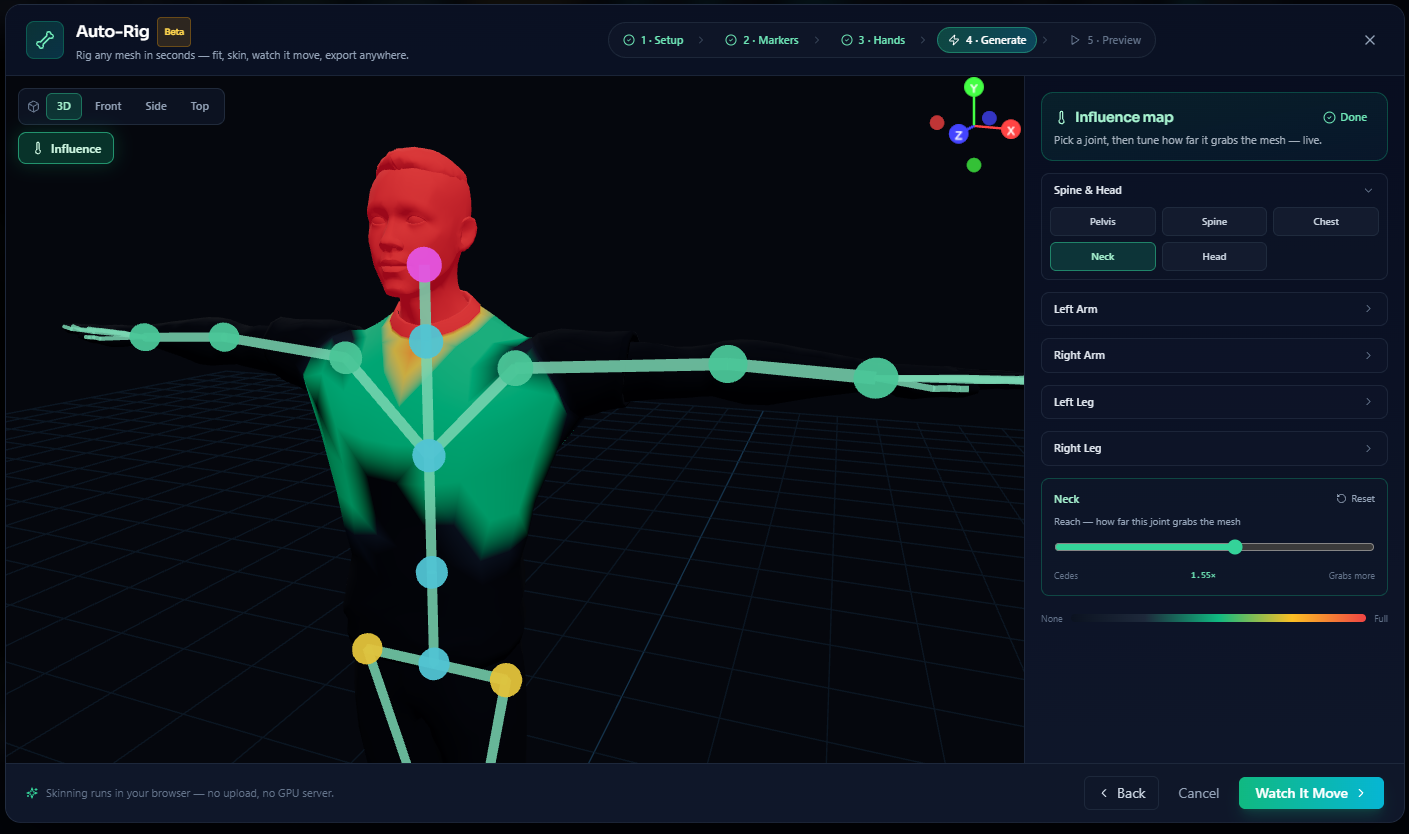
Generate Rig binds the skin to the skeleton, then shows you the Influence Map: a weight-color heat map of exactly how strongly each bone grips the mesh. Pick a bone and drag its Reach slider — the skin re-solves live, right in the viewport. This is weight painting without the painting: a few seconds to make a shoulder or a hip deform the way you want, with clean weights and no bleed across joints.
The Influence Map shows how each bone grips the mesh. Drag a Reach slider and the skin re-solves live.
Step 5 — Watch it move, then Done
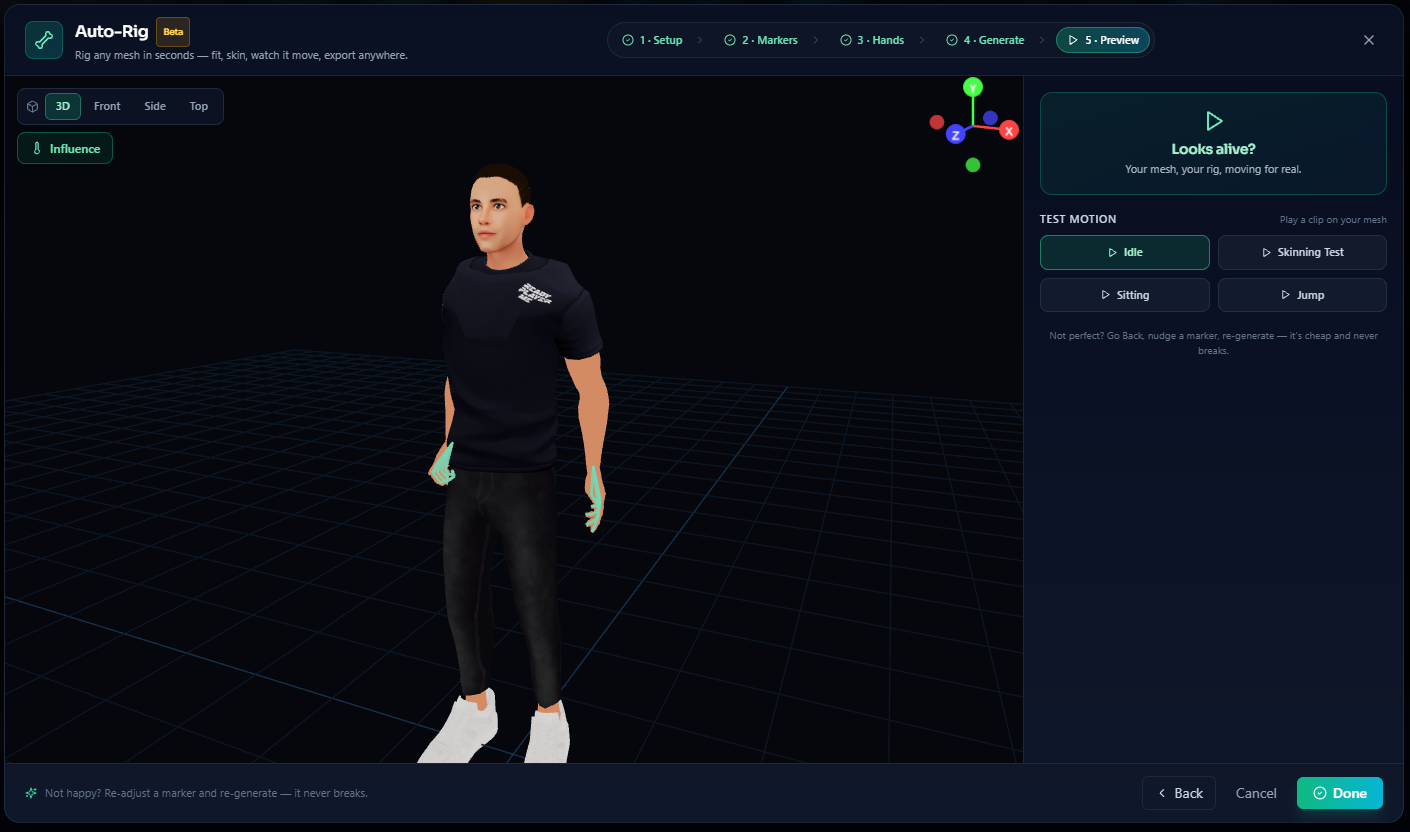
Before you commit, test the motion on your own mesh — Idle, Walk, Sit, Jump. This is the moment the character comes alive: you watch your rig actually move. Happy with it? Hit Done.
The rigged avatar drops straight into the editor — textured, in a neutral pose, fully riggable. Hand and foot IK are ready (move and rotate), the REC timeline is live, and the character is set up to retarget animations, capture motion from video, polish, and export anywhere.
What you get
- A clean, canonical skeleton fitted to your mesh, IK-ready out of the box.
- No-bleed skin weights you can see and tune with the live Influence Map.
- Optional fingers measured from your mesh, with thumb-roll and left/right symmetry.
- An avatar that behaves like any curated platform rig in the rest of the editor — Retarget, Vision Capture, Foot Locking, Polish, and Export all just work.
Tips for the best rig
- Start from a T-pose. Arms out, palms down, legs slightly apart. (A-pose support is coming.)
- One humanoid per mesh. Auto-Rig is tuned for a single human-shaped character.
- Keep the mesh roughly symmetric so Symmetry can mirror your tweaks cleanly.
- Review the markers before you generate — a five-second check beats a re-rig.
- Skip hands if you don't need finger animation; it's faster and cleaner.
FAQ & edge cases
Does my mesh get uploaded?
No. Auto-Rig runs entirely in your browser — your mesh never leaves your machine, and there's no server in the loop.
My character isn't a standard humanoid.
Auto-Rig is humanoid-focused. For quadrupeds, robots, or unusual skeletons, use Rig Studio to identify the joints by hand.
The hands came out rough.
Make sure the fingers are reasonably separated in the mesh, then re-run Measure from mesh. You can also skip hands for a clean body-only rig and refine later.
Can I still edit the rig after Done?
Yes. Once it lands in the editor it's a normal rig — pose it, drag the IK targets, record on the timeline, retarget onto it, and export.
What can I export?
Once rigged and animated, export to FBX, GLB, BVH, or Second Life .anim. Export is a Starter-tier feature.
Related
- Rig Studio — manual joint-identification wizard for non-standard rigs
- Retarget Studio — drop a Mixamo (or any) clip onto your freshly rigged avatar
- Vision Capture — capture motion from webcam or video onto the rig
- Exports — FBX, GLB, BVH, and Second Life .anim
- Editor Guide — the full Kinetiq Editor walkthrough