Rig Studio
A 3D-centric wizard that turns a raw mesh into an animation-ready rig. Auto-detects bones, builds IK chains, saves as a preset.
Tier: Builder Pro Menu:
Rig → 🎯 Rig Studio
What it does
When you load a custom avatar — one not from a known platform like Mixamo, SL Bento, Unreal Mannequin, or Roblox — Kinetiq has no idea what each bone is supposed to be. Without that mapping, Retarget, Vision Capture, Foot Locking, and other rig-aware tools can't function. Rig Studio solves the cold-start problem.
The studio walks you through:
- Identifying joints — pointing at the head, the hands, the feet, etc.
- Auto-generating IK chains — once joints are identified, IK chains build automatically.
- Saving as a preset — so the same rig type loads cleanly next time.
Once the rig is set up, the avatar behaves identically to a Mixamo or SL avatar in the rest of the editor.
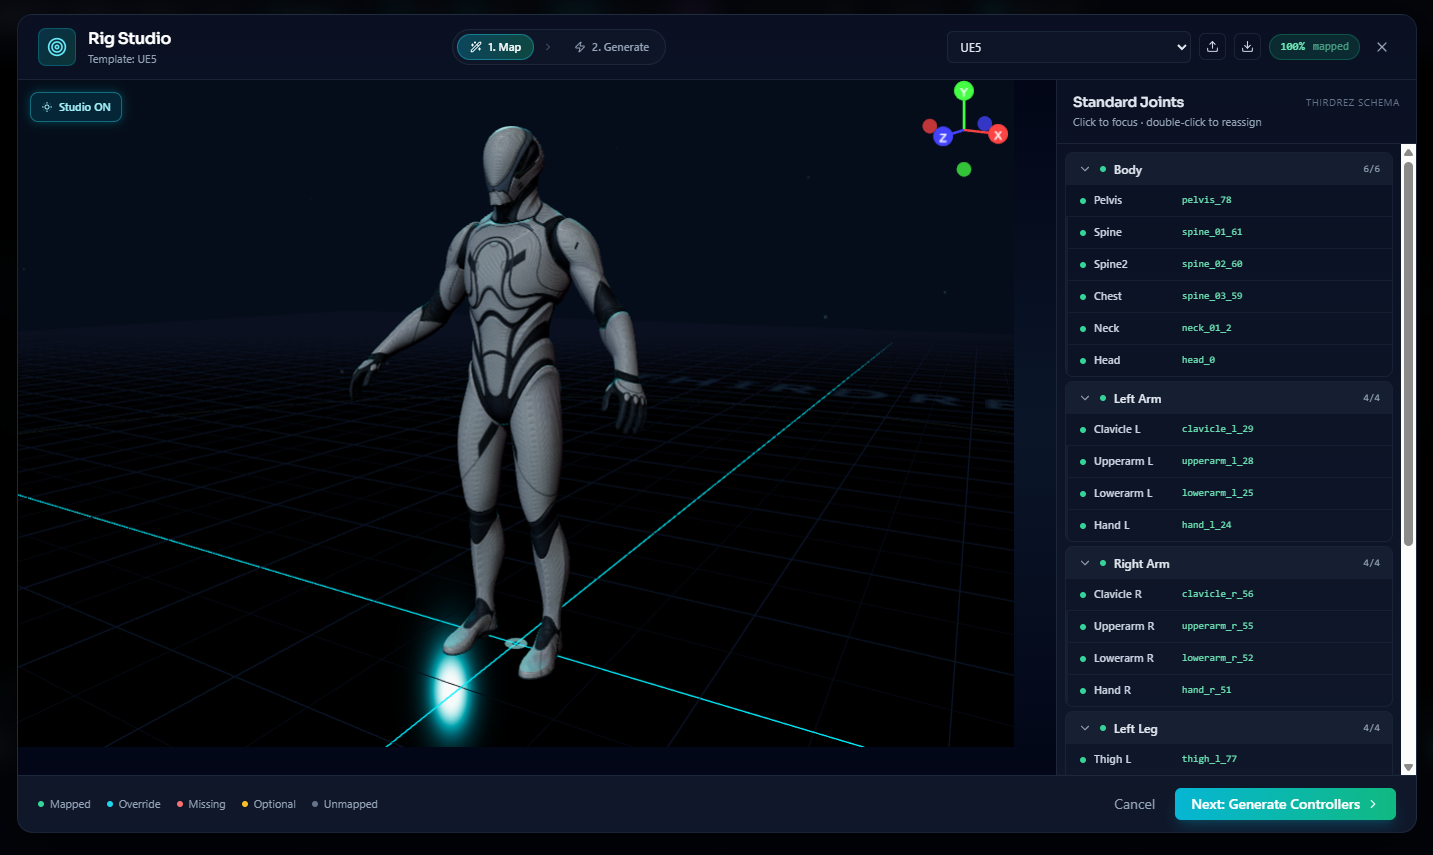
Rig Studio walks you through each joint visually — highlight a body part on the reference, click the matching bone on your avatar, move on. No 100-row dropdown table, no guessing bone names. A standard humanoid takes about a minute end-to-end.
Why it's a wizard (and not a manual table)
Rigging UX sucks across the industry. The typical "name your bones" workflow is a giant text table with 50-100 dropdown menus, the user gets lost, gives up, and the avatar ships unrigged.
Rig Studio replaces the table with a 3D-centric flow: the wizard highlights one body part at a time on a reference visualization, and you click the corresponding bone on your avatar. Visual, spatial, fast. A 50-bone humanoid takes ~60 seconds end-to-end if the rig is reasonably standard.
The wizard flow
Step 1 — Avatar overview
On entry, the wizard shows your avatar in a clean preview. Bones are visualized as small spheres. The wizard's first prompt: "Click the bone at the avatar's pelvis."
Step 2 — Joint identification
For each major joint in sequence:
- Hip / Pelvis (root)
- Spine (one or more segments)
- Neck → Head
- Shoulders → Upper Arms → Forearms → Hands
- Hips → Thighs → Shins → Feet → Toes (optional)
The wizard surfaces a reference body diagram showing which joint is being asked for. Click the bone in the 3D view; the wizard captures it and moves to the next.
If a joint genuinely doesn't exist (e.g. a quadruped doesn't have a "Hand"), skip it. The wizard adapts — IK chains skip missing joints gracefully.
Step 3 — Auto-rig generation
Once joints are identified:
- IK chains build automatically (arms, legs, optional spine).
- Up-axis and forward-axis are inferred from the joint positions.
- A summary view shows the resulting rig with IK targets visible.
Step 4 — Save as preset
Optional but recommended. Save the rig configuration as a named preset (Rig → Save Rig Preset). The next time you load the same avatar (or one with similar bone naming), Rig → Load Rig Preset applies the entire setup instantly — no wizard run needed.
Companion features
Add Constraint
The Rig menu has an Add Constraint entry for adding bone-to-bone or bone-to-target constraints (parent constraints, look-at constraints, etc.). The UX for this is being polished separately and will see a dedicated workflow improvement post-launch.
Save Rig Preset / Load Rig Preset
Persists the entire rig configuration (joint identification + IK chains + constraints) as a named preset. Presets are stored in your account and visible across sessions.
When you load an avatar that matches a saved preset (same bone names), the preset auto-applies if recognized — no manual load needed. Manual load is available if recognition fails.
Workflow — typical custom avatar session
- Drop your custom GLB or FBX avatar into the editor (
File → ImportorFile → Add Avatar). - Avatar appears in the viewport with bones visible as spheres.
Rig → Rig Studio. The wizard opens.- Walk through joint identification. ~60 seconds for a humanoid.
- Auto-rig generates. Verify IK targets look right (drag a hand, the arm chain should follow).
Rig → Save Rig Preset. Name it (e.g. "MyOriginalCharacterV2").- Avatar is now fully rigged. You can apply animations via Retarget Studio, capture new motion via Vision Capture, or edit manually with the timeline.
Next time you load the same avatar (or import a similar one):
Rig → Load Rig Preset → MyOriginalCharacterV2. Instant rig.- Skip the wizard entirely.
Platform-specific shortcuts
For known platforms, you don't need Rig Studio. The avatar loads with auto-detection that recognizes:
| Platform | Detection trigger |
|---|---|
| Second Life Bento | Bones starting with m prefix (mPelvis, mFootLeft) and the 159-bone signature |
| Mixamo | Bones starting with mixamorig prefix |
| Unity Humanoid | Standard Humanoid bone naming |
| UE5 Mannequin | UE5 Mannequin bone signature |
| Roblox R15 / R6 | Standard Roblox naming |
For these, skip Rig Studio entirely. The avatar arrives ready to animate.
Rig Studio is the escape hatch for anything not on that list — custom characters, indie game rigs, experimental sculpts, modded avatars.
Edge cases
Rig is non-humanoid
For quadrupeds, fish, robots, fantasy creatures, the wizard adapts as much as possible — skip humanoid joints that don't apply. IK auto-generates only for chains where the start/end joints are both identified.
Bones aren't in clean hierarchical parent-child
Some game-engine exports flatten the bone hierarchy (every bone parented to root). Rig Studio still works — joint identification doesn't require parent-child relationships, and IK chains build off the spatial layout.
Multiple meshes share the same skeleton
Common in MMO assets where outfits and the body share a skeleton. Rig Studio sees the underlying skeleton; the meshes pose correctly once the rig is set up.
Wizard misidentifies (you clicked wrong)
Back-step button on every wizard screen. Or restart the wizard — the previous run's data is in memory but not committed until you save the preset.
Related
- Retarget Studio — once your rig is set up, retarget animations from Mixamo or other sources
- Vision Capture — capture motion via webcam directly onto your custom rig
- Editor Guide — overall Kinetiq Editor walkthrough
- Platform Support — list of platforms that auto-detect without needing Rig Studio