Vision Capture
AI motion capture in the browser — webcam or video in, an editable animation out. Everything runs on your device: your video is never uploaded. Free to run; export needs a Starter plan or above.
Kinetiq ships two capture engines under the Capture menu. They aren't a ladder — they're two tools tuned for different jobs, and each wins on different footage:
⚡ Quick Capture ·
FAST— instant, rock-solid body capture. The everyday workhorse (also powers the live webcam mode). ✨ Studio Capture ·PRO— Amanda 2.0, our 3D engine: depth + both hands and fingers. The deliberate, dial-it-in take.
Tier: free to run (both engines) · Export: Starter and up Menu:
Capture → Vision (Webcam)·Capture → Quick Capture·Capture → Studio Capture
Which one should I use?
⚡ Quick Capture FAST | ✨ Studio Capture PRO | |
|---|---|---|
| Best for | fast iteration, webcam, dependable body | finished takes, depth, hands/fingers |
| Captures | full body · hips · feet | whole body + both hands |
| Depth (toward/away camera) | flat (planar) | 3D depth-aware |
| Fingers | — (use Studio) | ✅ drives 30 finger bones |
| Input | webcam or video file | video file |
| Weight | instant, tiny | larger model, one-time download |
| Fine-tune sliders | — | ✅ Depth · Turn · Lean · Hips · Sway · Foot lock · Smooth |
The honest truth: neither is universally better. Single-camera capture is a hard problem, and the two engines stumble on different clips. If a take won't behave in one, run the same footage through the other — it's often the fastest fix. And whichever you use, the Polish pass (below) is where raw capture becomes production motion.
⚡ Quick Capture
The fast, dependable body engine. It runs entirely in your browser and is the same engine behind the live webcam mode. No depth and no fingers — just clean, robust full-body motion, instantly.
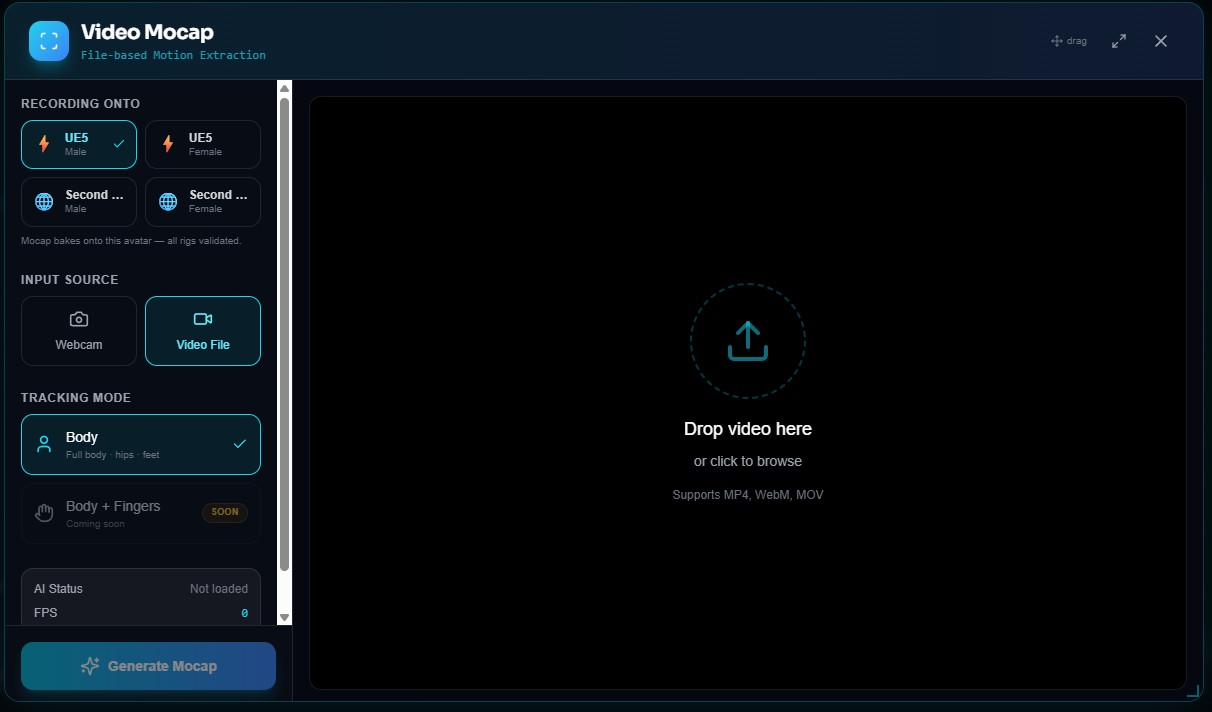
The Quick Capture modal: pick the avatar the motion records onto (Recording Onto — UE5 or Second Life, male or female, all rigs validated), choose your input, and capture. Body tracking covers full body, hips, and feet. Want fingers? That's Studio Capture.
Webcam mode — real-time
Capture → Vision (Webcam). Grant camera permission when prompted.- Stand back so your full body is in frame.
- Record → perform your motion → Stop.
- The captured frames land on your avatar's timeline as ordinary, editable keyframes.
Best for: short improvised motion (a wave, a kick, a dance move), interactive testing, "show, don't tell" animation.
Video mode
Capture → Quick Capture.- Pick the avatar under Recording Onto.
- Drop a video file (MP4, MOV, WebM).
- Generate → the clip is processed frame-by-frame and baked to the timeline.
Best for: longer sequences, performance footage, motion you can't easily re-perform live.
✨ Studio Capture — Amanda 2.0
The premium 3D engine. Studio Capture reads depth (limbs moving toward and away from the camera) and both hands and fingers — 133 tracked points in all — and bakes it onto your avatar, fingers included. It's powered by our Amanda 2.0 engine (~92-million-parameter 3D model) running 100% on your device.
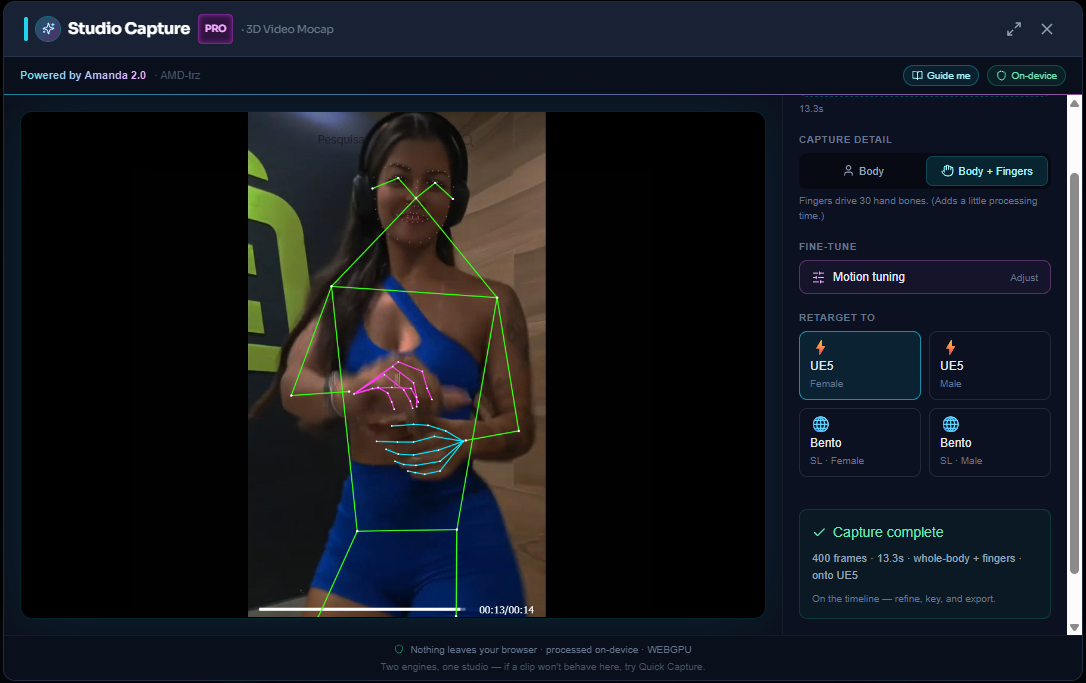
Studio Capture with Body + Fingers on: both hands are tracked (cyan + magenta) and baked onto 30 finger bones — all on-device. The done panel confirms the take is on the timeline, ready to refine, key, and export.
The first run downloads Amanda's model to your browser (one-time, then cached — grab a coffee ☕). After that, every capture runs locally and offline.
Capture → Studio Capture.- Drop a dance clip. The first frame previews instantly so you know it loaded.
- Choose Body or Body + Fingers, pick your Retarget target (UE5 / Bento SL), and hit Generate Motion.
- Watch the live skeleton track the performer; the motion — fingers and all — bakes to the timeline.
- Open Fine-tune to dial it in (see below), then Polish.
Best for: a finished, expressive take — hands, hip motion, reaches toward the camera — that you're going to refine and ship.
Tip: Studio Capture is open to run for free. Value is captured at Export (Starter and up), so you can capture, tune, and preview as much as you like before deciding to export.
🔄 Full turns (360°)
Does the performer spin, pivot, or turn their back to the camera? Flip Full turns (360°) ON before you generate. Instead of solving frame-by-frame (where a back-to-camera moment used to break the take), the whole clip is solved at once — so the motion tracks all the way around the turn. Pick your Turn engine: Assisted (guided body rotation — the Turn and Lean dials stay live) or Classic.
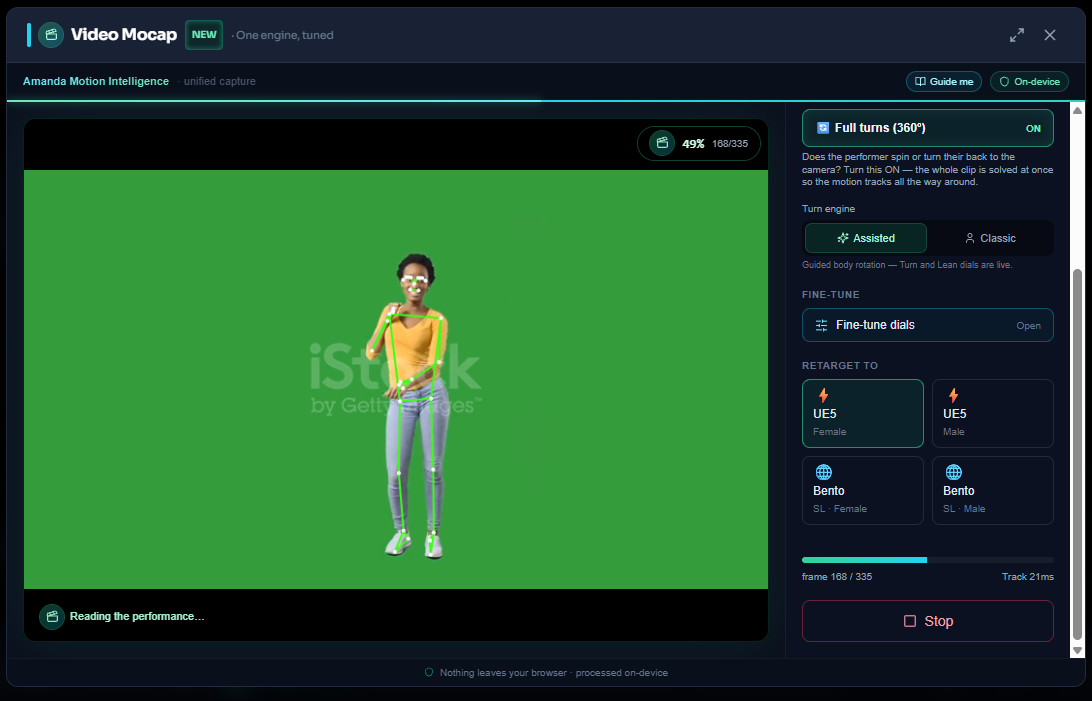
Full turns ON: the clip is solved as a whole, so spins and back-to-camera moments track all the way around — still 100% on-device.
Fine-tune — dial it in per clip
Single-camera, on-device capture can't do miracles, and every clip and every avatar is different — there's no universal default. So Studio Capture hands you the dials. Each slider starts at 0 (our tuned starting point); nudge − for less, + for more, one at a time, and re-watch. Changes re-apply to your last capture instantly (no re-processing).
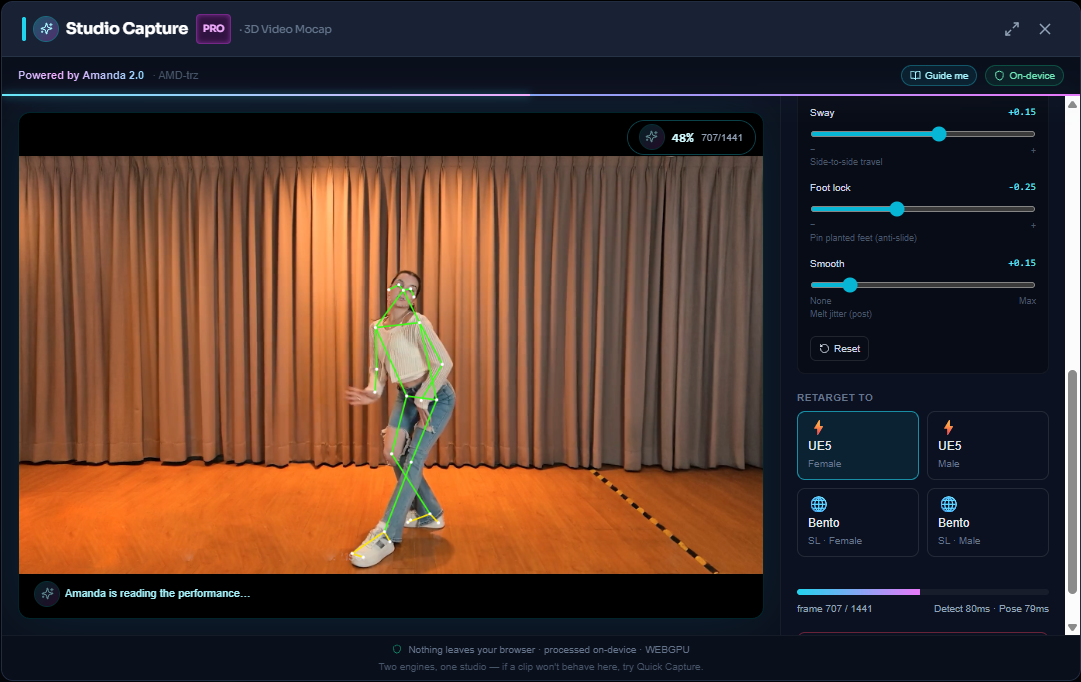
The Fine-tune sliders, live during a capture. Each sits at 0 (our tuned start) — nudge − / + to taste, per clip. The always-visible progress chip keeps the frame count in view even with the panel open.
And the dials don't disappear when the capture ends: after the bake, the Take Tuner floats right in the editor over your avatar. Your take is already on the timeline — flip Full turns or any Advanced tuning dial (Depth · Turn · Lean · Hips · Sway · Foot lock · Smooth) and watch the motion change instantly, with no re-processing. Judge it on the real character, not in a preview window.
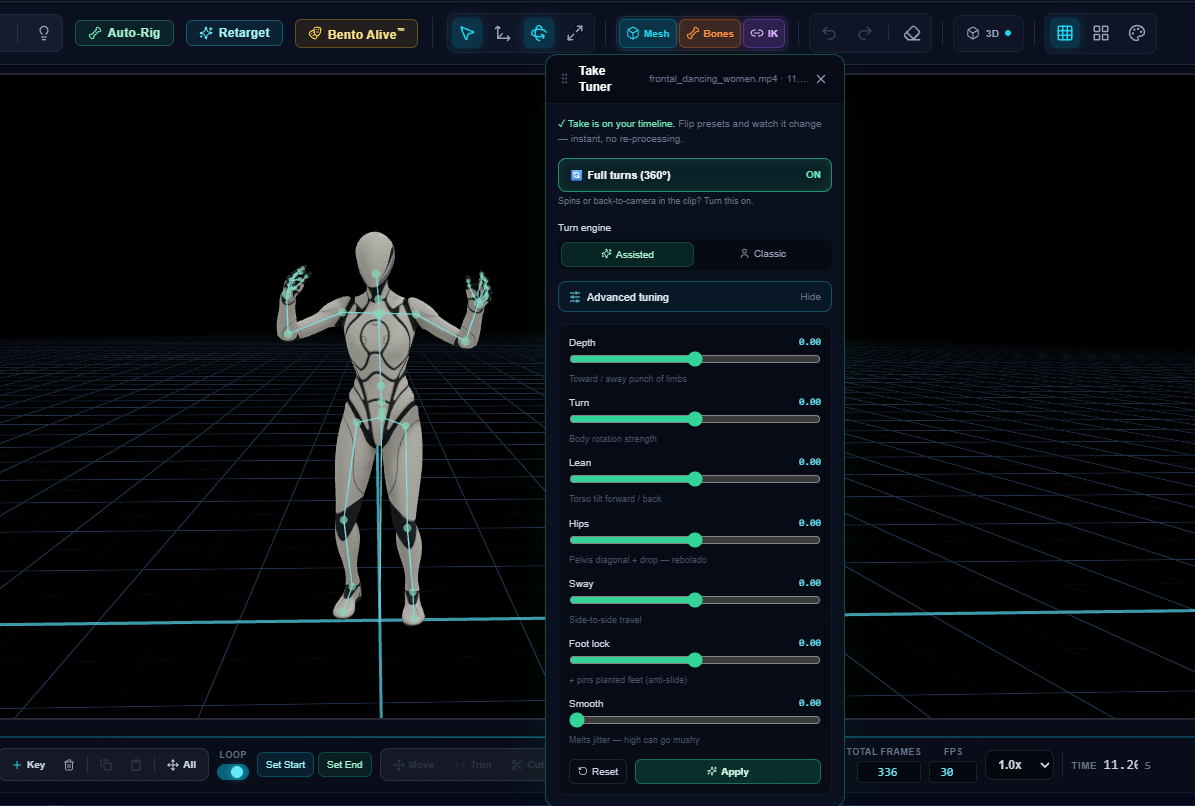
The Take Tuner after the bake: the take is on your timeline, and every dial re-applies instantly — no re-processing, no round-trip.
| Slider | What it does | Push + when… |
|---|---|---|
| Depth | limbs travelling toward/away from camera | reaches look flat and pasted to a plane |
| Turn | body rotation / facing | the avatar stays too front-on through a pivot |
| Lean | torso forward/back tilt | a bow or recline reads too upright |
| Hips | pelvis freedom — the samba/funk hip "drop" | a hip move looks locked or stiff |
| Sway | side-to-side travel | weight-shifts read rigid |
| Foot lock | pins planted feet (anti-slide) | grounded feet skate across the floor |
| Smooth | melts jitter (post-process) | a noisy / low-light clip shimmers |
(Use − for the opposite: arms punching out too far → less Depth; a body sliding sideways like it's on ice → less Sway; footwork meant to glide → less Foot lock.)
Shoot a clean source video
The cleaner the source, the less cleanup later — this matters most for Studio Capture, but helps both engines.
Frame & subject
- One person, full body head-to-feet, with a little breathing room at the edges.
- Fitted clothing — loose fabric, capes, and long hair hide the joints we track.
- Step back far enough (≈ 2–3 m) to stay in frame through the whole move.
Light & background
- Bright, even light — avoid harsh shadows, backlight, and windows behind you. Below a dim ~50 lux, accuracy drops sharply.
- A plain background that contrasts with your outfit.
Camera
- Eye level and locked off — a tripod beats handheld. Keep it still; let the performer move.
Performance
- Face the camera for the cleanest depth — and if the choreography spins or turns away, flip Full turns (360°) ON so the whole clip is solved as one motion (more on this below).
- Natural pace, no motion blur — crisp frames track best.
- For fingers (Studio Capture), keep hands open and visible, and open/close them during the take.
- ~10–30 seconds — one clear movement beats a long, busy clip.
Privacy — fully on-device
A real privacy claim, not marketing fluff. No video data ever leaves your device.
- The capture models run in your browser (WebGPU, with a WebAssembly fallback). The weights download once, then all processing is local.
- No upload step. Your webcam feed or video file never touches our servers.
- No telemetry of pose data. What you capture is yours alone.
- Camera/file permission is browser-scoped — revoke any time in your browser settings.
This is the same privacy posture as the rest of the platform — the principle is consistent.
Polish — the human touch after the AI
Raw capture is never the final product; even studio mocap goes through cleanup. Kinetiq's Polish and Physics tools were built for exactly this, and they chain beautifully. This pass is not optional — it's the craft.
1. 🌊 Smooth out the jitter
Polish → Smooth. One slider melts camera noise and softens arcs while keeping your performance. Whole clip or just a Region, and it stacks — apply, judge, apply again. Ctrl+Z undoes any pass.
2. 🛤️ Watch the path turn green
Toggle Trajectory View (the spline icon in the viewport toolbar). It draws the selected bone's motion path, color-coded by smoothness — green is silky, red is jagged — and updates live while you drag the Smooth slider.
3. 🦶 Plant the feet
Single-camera capture almost always has slight foot drift. Open Foot Locking: it paints the footprint trail, bends the legs naturally to hold each plant, and shows the per-foot cm of slide it's killing. When it looks right, Bake to Timeline — the fix becomes real keyframes that survive export.
4. ✨ Add life
Physics → Jiggle Bones drives secondary motion on hair, cloth, and soft tissue. Subtle is believable; too much reads like rubber.
5. ✂️ Trim & refine
Polish → Simplify Keyframes reduces the dense per-frame keys to a clean, hand-editable set. Polish → Range clears, copies, or pastes a stretch. Use REC + SOFT to record manual tweaks that ease across nearby frames, or toggle Bones, select a joint, and Move / Rotate by hand to reclaim anything the single camera couldn't.
6. 📊 Validate
Quality Score measures the result in world space — Smoothness, Foot Contact, Loop, Balance. Green rings = ship it.
Every step is non-destructive: ordinary keyframes on the timeline, undo-able and editable. Nothing here is throwaway output.
Honest limits — the physics of one camera
We'd rather tell you the edges up front than have you fight them.
- Depth is inferred from a single lens. Toward/away motion reads well with Studio Capture's depth, but a single camera can never recover true depth perfectly. Front-on framing reads cleanest.
- Back-to-camera moments hide the front of the body — Full turns (360°) is the answer, not magic. With the toggle ON, the whole clip is solved at once so spins and turn-arounds track all the way around; but one lens still can't see what's occluded, so the frames where the body faces fully away are inferred from the motion around them. Great for turns and pivots; a long scene performed entirely back-to-camera will still want a hand pass.
- Axial twist (a forearm rolling in place) is not observable from keypoints — fix it by hand if it matters.
- Left/right can flip for a few frames during back-facing or fast motion. Run Mirror Animation in
SWAPmode to spot and fix. - One person at a time. Multi-person scenes capture the most prominent figure.
- Fingers need to be seen. If hands are far from the camera, low-res, or blurred, switch to Body — finger detail won't capture well from a few muddy pixels.
None of these are bugs — they're the trade we accept for private, on-device, single-camera capture, and Polish + a few manual keys close the gap. (Our own cleaner models are an ongoing effort.)
Edge cases
- Webcam permission denied → the webcam mode can't run; switch to Quick Capture or Studio Capture and use a recorded video instead.
- Video file won't load → browsers handle MP4, WebM, and (usually) MOV. Convert AVI/MKV to MP4 first.
- Very long videos → processing scales with length; trim the source to the segment you want before importing.
- "Couldn't find a clear person" → use a clip where the full body is visible and well-lit; re-frame and try again.
Related
- Rig Studio — set up a custom rig before capturing onto it
- Foot Locking — almost always run after capture to clean foot drift
- Smooth · Mirror Animation — core post-capture cleanup
- Retarget Studio — bring in existing clips instead of capturing
- Exports — FBX / GLB / BVH / .anim for your platform